Showing posts with label Actionscript. Show all posts

Tuesday, June 05, 2012

New Game: Binkos

I've just released a new game: Binkos.

Background.
Back in 2007 I started working for Gamesys, specifically in the Bingo team. After more than 2 and a half years of working and speaking only about bingo, bingo balls and bingo calls I decided to move companies.
My time in Gamesys was great, I met and worked with lots of nice people, many of them were really talented and to pay my respects I created Binko.
As you can see, some typical elements in a bingo game are there: 90 bingo balls, a dabber and a jackpot. The idea was to hit the jackpot to get a prize, randomly selected from 6 prizes (one for each member of my team).
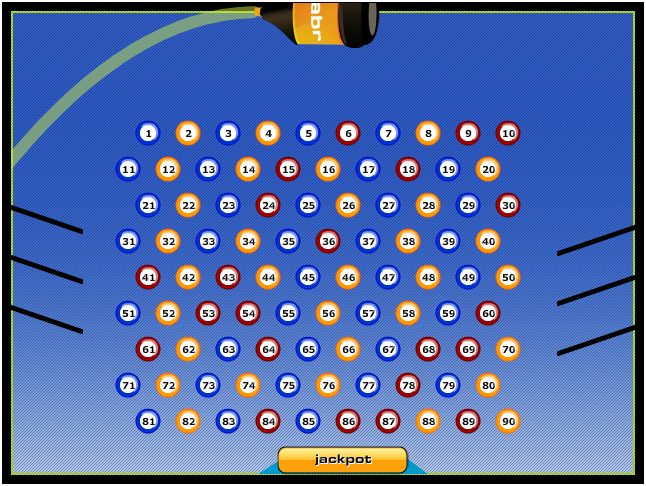
Bingo is dead. Long live Binko!


Many people might think the game is just another Peggle's clone, however, I was actually inspired by Players Plinko, one of the first mini-games I worked on in Gamesys but I won't deny there's an obvious Peggle influence as well.


That was just over 2 years ago, so yeah, the game engine is a bit old already. 

Revamp.
Last year while having a chat with one of my current work-mates (Zuzanna Kucharska) I mentioned the game and talked to her about FlashGameLicense.
She started working on the graphics, I updated the code and a few months later we had Binkos ready to be sold.

 
Despite the fact she did a great job, the game couldn't get any bid higher than $500 with some bids as ridiculously low as $80.
This is an early stages video of Binko's game-play:

First there was only one background and the player would have 25 balls to start with. Later on we added particle effects, different backgrounds for the 5 different levels (from late night to early morning) and the number of balls changed to 7 per level, carrying over any balls not used in previous levels.
After about 6 months we tried the Quick Auction option with the same results. Pathetic low bids.
We couldn't sell the game, so, I decided to release it as a Games-Garden game.

Release.
The first site I uploaded the game to is obviously Games-Garden.
Now the game has been released in:
- Newgrounds.
- Kongregate.
- Mindjolt.
Some other websites have taken the file from Newgrounds already so the viral distribution has already started.
I'll be releasing a Mochiads version of the game soon and see how it goes.

Tech-talk.
Some of the 3rd party libraries I used in Binkos are Box2D library for the physics in the game. Tweener, as usual, for all other animations like the boat going from side to side, points update, etcetera. Flint Particles library for the particle effects when the ball hits the tokens. Playtomic for the game analytics. Leaderboards are from MochiMedia and of course I'm using CPMStar and MochiAds for in-game advertising.

Now, if you're curious about the game and haven't played it yet, go and play Binkos at Games-Garden.

Wednesday, November 09, 2011

Sound spectrum visualizer

I know I'm a bit late for playing with the AS3 sound API but I never had the chance to check it out before until some time this year and specially in recent days as I got the flu and haven't had much to do when at home (my girlfriend doesn't want to catch it so she's sleeping in another room and I'm not allowed out of this room...).
Anyway, after playing a bit with the SoundMixer class, and adding basics Flint particles in the background (yeah, some default example), I ended up with a small flash visualizer and uploaded to YouTube.
 

I think it looks cool, plus I love the song, Deckers Theme by Dom & Roland.
The base of the code can be found at this old post from Mike Chambers. I advise you to play a bit with the code, you can get some really nice results. And by the way, it's never too late to learn new stuff ;)

Monday, November 07, 2011

New Game: Emotiblocks

Just had a quick look at my forgotten blog (yes, the one you're on now) and noticed it's been a while since I mentioned any of my works.

Well, I've been busy doing games and other experiments mixing many technologies as usual.
Anyway, I want to introduce you to my latest released game: Emotiblocks.

It's a match 3 type of game with power-ups and 1 minute levels.
If you don't feel like playing it now, maybe this video from early development stages will tease you enough to try it for yourself:


And if in case you feel like adding it to your site, just download the .zip file from Games Garden 'Games for your site'.

Sunday, August 07, 2011

Flash Games Event: Mochi London 2011

Mochi London 2011
Mochi London 2011 is a FREE 2-day Flash games event taking place on August 27th-28th, 2011 in central London.

It has been brought to you by members of the Mochi Media community, Mochi London will bring local and international people together to share insights and experiences about the Flash games market. We're calling at:

  • Flash game developers
  • Flash game artists and designers
  • Flash game publishers
Whether you live or work in England or anywhere else in the United Kingdom, or even elsewhere in Europe, this event will be well worth the trip. Mochi community members Chris Jeffrey (ChrisJeff) and myself are organizing the event, with support provided by Mochi Media.

Come and join us! it will rock!
The speakers include:
  • Iain Lobb (freelance Flash / ActionScript developer)
  • Stuart Allen (developer of Gravitee Wars)
  • Martine Spaans (Ubisoft, formerly of SPIL Games)
  • Michael Hudson (ActionScript developer, CodeHeads)
  • Merlin Gore (Flash developer, FlashGameLicense.com)
  • Mike Jones (Platform Evangelist, Adobe Systems)
Don't forget to register and find out more at the Registration Page.

Tuesday, November 30, 2010

Extending AS3 trace

On a previous post (debugging spaghetti code) I mentioned it's important to know where a specific function is being called.
From Adobe, this is the description of what the function trace does:
Displays expressions, or writes to log files, while debugging.
We can trace anything anywhere in our code, however, as mentioned before, how do we know where? we could then specify this in each trace call, for example:
trace('MyClass - ' + someValueToTrace);
trace('MyClass - ' + someOtherValue);
Right, instead of writing the object's name in every call, we could have a private function to do this:
private function debug(objectToTrace : Object) : void
{
trace('MyClass' + objectToTrace);
}
Then, instead of calling 'trace(blah)' we use 'debug(blah)' which will include the class name. For example:
debug(someValue);
// outputs: 'MyClass - someValue'
Advantages? well, if in case we don't want to trace anything any more, we just comment out the 'trace' line in our code rather than deleting every single call to debug in that class...

Cool! now we know where are we using 'trace'.

Can we extend it? sure thing! and this is my solution:

- Create a class in your utils package, name it Debug.as.
- Create a static function to trace the name of the caller plus any parameter.
Code:
package com.mysite.core.utils
{
import flash.utils.getQualifiedClassName;

public class Debug
{
/**
* // Writes in the flashlog the name of the object calling this function and any number of parameters

* Debug.print(this, someValue, someOtherValue);
*/
public static function write(caller : Object, ...arguments) : void
{
var objectString : String = getClassName(caller);
trace(objectString + ' - ' + arguments);
}

private static function getClassName(object : Object) : String
{
var className : String = getQualifiedClassName(object);
return className.slice(className.lastIndexOf('::'));
}

}

}
If we don't use the second function (getClassName), the output would be '[object MyClass]' so that's why we slice a string to get only the very class name.
Now you can call Debug.write instead of trace in the debug function on every class:
private function debug(objectToTrace : Object) : void
{
Debug.write(this, objectToTrace);
}
// use debug(objectToTrace) instead of trace(objectToTrace)
Sweet! :)

Friday, November 05, 2010

A poor man's Currency Formatter

*Title stolen from Arthur Debert Tweener tips.

While the Adobe flash.globalization package is still in beta, which includes a CurrencyFormatter class, we need to find a quick way to display an amount formatted as currency, with thousand separator and decimal mark.
In this case, we are targeting USA and UK so the thousand separator is a comma and the decimal mark is a point.
Right, so this is some simple logic used:
  • multiply the number by 100 to get the decimals
  • check if new number is zero or less than 100 (if less than 100 then is a decimal)
  • otherwise get the decimals and keep them aside
  • divide the rest of the number into groups of three and push them into an array
  • reverse the array and add the decimals
  • voila! you got the number formatted as currency!
So, yeah, the commas in that separate elements in the array work now as thousand separators :)
And here is the code:
private function formatCurrency(amount : Number) : String
{
var newAmount : String = String(Math.round(100 * amount));

if (newAmount.length == 1) newAmount = '0';

else if (newAmount.length == 2) newAmount = '0.' + newAmount;

else
{
var decimals : String = '.' + newAmount.slice(-2);
newAmount = newAmount.substring(0, newAmount.length - 2);

var amountGroup : Array = new Array();
while (newAmount.length > 3)
{
amountGroup.push(newAmount.slice(-3));
newAmount = newAmount.substring(0, newAmount.length - 3);
}
amountGroup.push(newAmount);
amountGroup.reverse();
newAmount = (Number(decimals) > 0) ? (amountGroup.join() + decimals) : amountGroup.join();
}
return newAmount;
}

Oh well, it does the job and as the CurrencyFormatter from Adobe is not implemented YET in pure AS3 (Flex Builder 4*), that code is useful :)

Salut!

*The CurrencyFormatter supported in Flex SDK 4.1 works with MXML only.

Thursday, November 04, 2010

Debugging spaghetti code

spaghetti-code

As a programmer, sometimes you find yourself dealing with this nasty badly written code and your task is to fix some even nastier and ugly looking bugs.

Whether is code you wrote yourself some years ago or someone else's (which makes it even worse) as it's your task to dig into the code, you will need help, help to understand where in heaven one of the dozens of public methods in that class is being called.

Yeah, in that code, almost all the methods in all the classes (including the main one) are public and of course is highly coupled making it almost impossible to read or to maintain.

Spaghetti code, hundreds of messy lines of 'code' (?) in each messy class... oh the joy...
After hours of work, after cursing everyone around you, you find the function which is causing the issue but... where is it being called? who's calling it? why?
Here it comes Stack Trace to the rescue! woohoo!
And the line of actionscript 3 that has saved me from cursing even the ones that are not around me is:

trace(new Error().getStackTrace());

That line will output in the flashlog the path (including class names, and code lines) that the thread takes before throwing the error (you will need flash player debugger to see the error). Now we now where the function is being called, time to continue debugging...

*Image taken from SpreadShirt.co.uk.

Monday, June 22, 2009

Inspiration: Flash and meow

I just added a new link on my blog roll: Zoltan Bornemissza.

Zoltan is the new Lead Flash Developer from my team at work and I had a chance to check his blog which is full of cool stuff!

Flash and meow

I recommend you to play with the fractal experiments and get some inspiration :)

salut!

Tuesday, June 10, 2008

Flash Security Policy Server


With the introduction of Flash Player 9.0.115.0 another issue came out when trying to make a socket connection to a server.
Before the release of this Flash Player version the use of a crossdomain.xml would deal with the loading of external data into a flash application, however, Adobe decided to change these security policy as explained on this document.

To fix this issue, Syed Meerkasim, a Senior Java Developer from where I work has released a Flash Security Policy Server created in JAVA that you can download for free from this link.

His new website, Flash Resources, will be updated on a regular basis so I advice you to keep an eye on it ;)

salut!

Thursday, May 15, 2008

Tweener for games: Updating Amounts

Following up on the Tweener for games tutorials, this time we will see how to update amounts gradually using Tweener to make them look nice & smooth.

As an example we can see my game GAIA - Guess Who? where the score is updated gradually instead of in one step (immediately) adding more to the user's experience and making the game more playable and enjoyable. Trust me, these little details can make a difference ;)

Update amounts gradually using Tweener:
What I've got on stage is a dynamic textfield with instance name "txtScore".
To give it a value, we declare a variable called myScore:

var myScore : Number = 100;
txtScore.text = myScore;

If you run the movie, your txtScore shows 100.
Nothing exiting I know... :P

Because we need to update this amount when a certain event happens, then we add a button, we will call it mcAddBonus.
Now let's use tweener to update the score adding a 50 points bonus:

import caurina.transitions.Tweener;

var myScore : Number = 100;
txtScore.text = myScore;

mcAddBonus.onRelease = function() : Void
{
Tweener.addTween(this._parent, {myScore:myScore + 50, time:1, onComplete:function() { txtScore.text = Math.round(myScore); }});
}


Testing the movie, whenever we press our button after a second myScore updates by 50.
Still nothing special :(
but, how about if we use the tweener onUpdate parameter instead of onComplete?
the onComplete only updates our score when the tween has finished but as we saw on the previous example, onUpdate updates the value gradually before the tween finishes.
Let's change the code:

import caurina.transitions.Tweener;

var myScore : Number = 100;
txtScore.text = myScore;

mcAddBonus.onRelease = function() : Void
{
Tweener.addTween(this._parent, {myScore:myScore + 50, time:1, onUpdate:function() { txtScore.text = Math.round(myScore); }});
}


Sweet!
I must say I love Tweener, is a great tool :)
and this is the example:


salut!

Tuesday, April 15, 2008

Tweener for games: Countdown

Last week I came back from holidays, I was back in my home country after almost 6 years since I left, that's why I couldn't update the blog...
Anyway, as mentioned before, I'll be writing some tutorials on how to use Tweener for games development, however, take into account that the code can be used on other applications as well...
The first "tutorial" is

Creating a countdown using Tweener

From my point of view, adding a countdown to a game helps to improve the playability as the user feels more challenged to finish certain task.
After reading Arthur Debert's Tweener Tips, I got the idea on developing further his "Poor's man timer":

Tweener.addTween(this, {time:0.3, onComplete: myFunction});

Right, so if we put it into a function, then we have:


var timeleft : Number = 30;

function tweenDown() : Void
{
trace(timeleft);
timeleft--;
Tweener.addTween(this, {time:1, onComplete:tweenDown});
}

tweenDown();


First we declare a variable called "timeleft" and set it to 30, so we will count down from 30 seconds to 0.
The function tweenDown() traces the updated "timeleft", decreases the timeleft value by one and using tweener it calls itself every second thanks to the onComplete parameter.

If we tide up a bit, we can add another function to trace the updated value of timeleft, then we have something like:

var timeleft : Number = 30;

function showTimeleft() : Void
{
trace(timeleft);
}

function tweenDown() : Void
{
timeleft--;
Tweener.addTween(this, {time:1, onUpdate:showTimeleft, onComplete:tweenDown});
}

tweenDown();


The function showTimeLeft() will trace the updated value of timeleft thanks to the parameter onUpdate and this allow us to do something else instead of only tracing; we can add a textfield (with instance name txtTime) to show us the updated timeleft value and the updated script would be:

var timeleft : Number = 30;

function showTimeleft() : Number
{
return txtTime.text = timeleft;
}

function tweenDown() : Void
{
Tweener.addTween(this, {time:1, onUpdate:showTimeleft, onComplete:tweenDown});
}
tweenDown();


Now, the problem is that when the countdown reaches 0, it doesn't stop!
so we can add another function to check if there's any "timeleft" and if there isn't, then do something else. The final script for a simple countdown is:

import caurina.transitions.Tweener;

var timeleft : Number = 30;

function showTimeleft() : Number
{
return txtTime.text = timeleft;
}

function tweenDown() : Void
{
Tweener.addTween(this, {time:1, onUpdate:showTimeleft, onComplete:countDown});
}

function countDown() : Void
{
if(timeleft > 0){
timeleft--;
tweenDown();
} else {
trace("GAME OVER!");
Tweener.removeAllTweens();
}
}

tweenDown();


and this is the example:


Salut!

Monday, March 17, 2008

Best Practices? no thanks...


Generally speaking, best practices are good. But what are best practices? from the Wikipedia:

...Best practices can also be defined as the most efficient (least amount of effort) and effective (best results) way of accomplishing a task, based on repeatable procedures that have proven themselves over time for large numbers of people.


Right, so in theory we want to accomplish a task in the most efficient way and I absolutely agree with that not only applied on programming but in other things we do in life. Now, if we are talking about programming and more specifically, programming ActionScript for Games, then the thing changes a bit and mostly will depend on one factor: are you developing as part of a team?
if the answer is no, and you are definitely the only one working on certain game (or any application in general), then my advice is: "AVOID BEST PRACTICES".

and no, I'm not mad (well, not that much...) but I've opted for not using best practices because:

- The number of flash developers is growing (this is great!)
- The number of people learning actionscript is growing (is fantastic!)

ok, both are actually good things, but...

- the more people learning actionscript, the more people use the ever growing number of evil tools to decompile your applications.

And that's the thing, I've been working long hours on a specific script, using my knowledge, my brain, studying, experimenting, testing, debugging... and all that just for a bandit that will come and steal all the hard work to monetize with it?
NO THANKS!

the problem is, these days is very easy to monetize with your games, both using MochiAds and getting sponsors so there's a whole lot of thieves out there waiting for you to release a game just to steal some pieces of your code (if not all of it...)

Anyway, at the end of the day, they will manage to do it but I want to make their work not that easy, so from now on, I'll start using something like alphanumeric properties and methods so a code thieve will find only
var s48758wikk49 : String = "alajsktha"
that in fact it should be something like
var score : Number = 567;
and forget about best practices... :D
will be fun!

and of course, I'm seriously thinking about buying SWF Encript from Amayeta, I think any serious flash developer should have a copy of it.

ADVICE: Protect your code!

Salut!

Sunday, September 02, 2007

Building desktop widgets with Zinc: Right click

{MDM} Script

I've written another tutorial about Building desktop widgets; I had explained before why I'm using MDM Zinc and what I've done with it so far.

On this new tutorial you will see a bit of the {mdm}Script and a bit more of actionscript as I mention another feature of the ContextMenu class that used before in my post Building flash web widgets: Right click.

I must say there's lots of potential in Zinc, just have a quick look at its documentation and you will know what I mean, specially the {mdm}Script 2.0 API; there are many options from database connectivity to socket communication but the best of it is the support forum where people like Peter Blazejewicz are happy to help you out. I mentioned Peter because his willing to help is just impressive!

If you followed my previous tutorial, go and check this one out as after it you will have a desktop widget ready to distribute.

salut!

Monday, August 27, 2007

Building flash desktop widgets with Zinc

MDM Zinc

I just posted a thread in the Widgipedia Workshop forum about "building flash desktop widgets with Zinc".
Hopefully this week I will have time to continue writing about it, I know many people are interested in building desktop widgets and I'm happy to share my experience.

As I mentioned before, I was very lucky to win a copy of MDM Zinc in last year's Flash on the Beach, since then I've been using it to create desktop widgets and screensavers, among them:
- To-do sticky note
- CPU-usage (pentium IV only)
- Firefox-Calendar
& a cool Firefox Screensaver.

If you are interested in building desktop widgets and are familiar with flash, then follow this link.

salut!

Thursday, August 23, 2007

Building Flash web widgets: right click


If you are thinking "when is this guy going to finish speaking about 'building flash web widgets'"?
well, I still have got two more things to talk about (sorry, I know I said that before...), but my idea is to write as much as possible so you have a better understanding about "best practices" when building widgets ;)

This time is about managing the "right click" from the mouse and this is considered best practice in any web application, not only on widgets.
Best practice?
why do we need to care?
well, you never know what a users is going to do with your application and is better to prevent possible bugs testing whatever is possible to do. For instance, whenever I'm checking someone else's work, I'm always using the right click to zoom-in to their applications, press play, etcetera as I'm very curious and want to know if the developer cares about details; trust me it makes a difference.

The first thing we need to do is to get rid of the "built-in items", yes, the same from the picture above, and to do so we need only one line of code:

Stage.showMenu = false;


Adding that simple line helps us to avoid the user to do something we didn't want him/her to do like pressing "rewind" or "play" (if using more than one frame). I normally use one only frame so the right click menu doesn't show some options but still it shows the "zoom-in", "quality" & "print" among others. However, with this line of code we won't be able to get rid of all the items, for example the "about adobe flash player 9..." as is part of the "copyright" from Adobe.

And talking about copyrights, can we add our own copyright or something like that?
certainly we can and the way to do so is with the following actionscript in the first frame:

function linkToMe():Void {
getURL("http://overloadstudios.blogspot.com/");
}
function linkToDistributor():Void {
getURL("http://www.widgetbox.com");
}
var cmMenu:ContextMenu = new ContextMenu();
cmMenu.hideBuiltInItems();
cmMenu.customItems.push(new ContextMenuItem("Built by Overload Studios", linkToMe));
cmMenu.customItems.push(new ContextMenuItem("Powered by widgetbox", linkToDistributor));
this.menu = cmMenu;


We won't need the Stage.showMenu = false; anymore as with this code we are hiding the "traditional" menu.
What we have are two functions to link to this blog and to the widget distributor, in this case Widgetbox.
Then we are instantiating the class "ContextMenu", hiding the "built in items" and adding two items to the new "array" of items.
The last line is to tell flash which menu should show.
You can add more items if you want to or remove one or the other, but remember to add this right click menu to all your widgets to allow users to know who built the widget and to visit your website; this is a nice way to show that you are the developer and not with a cheese roll over banner as other people do. :P

Salut!

Saturday, August 18, 2007

Building flash web widgets: adding Tweener

There was something missing from my previous series of posts "Building flash web widgets" that I want to talk about, in fact there are three things I want to add:

The code in AS3
- I haven't yet written a single line of actionscript 3 as both at home and at the office I'm still using Flash 8 but Felix Sanchez has re-written the code into actionscript 3 so please check it out if you are already using Flash CS3 or an alternative tool to publish Flash Player 9.

Customization
- As I said before, I have changed the design so its clearer for the user to understand and I have added something very important for web widgets: customizable colours.
Customization in one of the most important bits of a widget if in case you want it to be successful and popular, this is something I had to learn from trial and error as at the beginning I didn't think about giving more options to the users and their complains taught me the lesson...
Tip: add as many customizable options as you can because nowadays the web is very users centric and users want to show their own style and taste in their websites.

Adding Tweener
The clock shown in the first post of the series uses a slightly different code than the one in the third post. The difference is Tweener and the code used is:


import caurina.transitions.Tweener;


var timedate:Date = new Date();

var realHours = timedate.getHours();

var hour:Number = (realHours<=12) ? realHours : realHours-12;

var minutes:Number = timedate.getMinutes();

var seconds:Number = timedate.getSeconds();

delete timedate;


seconds_mc._width = seconds*3+6;

seconds_mc._height = seconds*3+6;

minutes_mc._width = minutes*3+6;

minutes_mc._height = minutes*3+6;

hours_mc._width = hour*15+6;

hours_mc._height = hour*15+6;


function attachSecond():Void {

seconds++;

Tweener.addTween(seconds_mc, {_width: seconds*3+6, _height: seconds*3+6, time:0.8, onComplete:checkSeconds});

}

function removeSeconds():Void {

Tweener.addTween(seconds_mc, {_width:0, _height:0, time:0.8});

}


function checkSeconds():Void {

if(seconds>59){

seconds = 1;

removeSeconds();

attachMinute();

}

}


function attachMinute():Void {

minutes++;

Tweener.addTween(minutes_mc, {_width: minutes*3+6, _height: minutes*3+6, time:1, onComplete:checkMinutes});

}


function checkMinutes():Void {

if(minutes>59){

minutes = 0;

removeMinutes();

attachHour();

}

}


function removeMinutes():Void {

Tweener.addTween(minutes_mc, {_width:6, _height:6, time:1});

}


function attachHour():Void {

hour++;

checkHours();

Tweener.addTween(hours_mc, {_width: hour*15+6, _height: hour*15+6, time:1});

}


function checkHours():Void {

if(hour>11){

hour = (realHours<12)?12:removeHours();

}

}


function removeHours():Number {

Tweener.addTween(hours_mc, {_width:6, _height:6, time:1});

hour = 1;

return hour;

}

timer = setInterval(attachSecond, 999);


and what's the difference?
well, now when changing from second to second, minute to minute and hour to hour, the change is more smooth and when reaching the limit, either 12 or 60, there's a very nice animation when they go back to the origin (the centre of the widget).
Oh lovely tweener! :D

Let's see one of the old functions:


function attachSecond():Void {

seconds++;

seconds_mc._width = seconds*3+6;

seconds_mc._height = seconds*3+6;

checkSeconds();

}


applying tweener:

function attachSecond():Void {

seconds++;

Tweener.addTween(seconds_mc, {_width: seconds*3+6, _height: seconds*3+6, time:0.8, onComplete:checkSeconds});

}

in the same line of code we are managing width, height and calling the next function. I think is cool, that's why I like tweener so much.

and the final widget:


That's using the same code but different design so now is you changing the design and getting your widget ready to upload to a widgets distributor (That I will explain in a future post)

salut!

Tuesday, August 07, 2007

Building flash web widgets - Part III

This is the third part of the series "Building flash web widgets". If you haven't read the previous posts, please check the following links:
- Building flash web widgets - Part I
- Building flash web widgets - Part II

ok, let's continue.
So far if you test your movie, you should see something like:


is static and is boring, so let's add some more code:


function attachSecond():Void {
seconds++;
seconds_mc._width = seconds*3+6;
seconds_mc._height = seconds*3+6;
}

timer = setInterval(attachSecond, 1000);


with this code we are telling flash to change seconds_mc width and height to a bigger number every 1000 milliseconds (1 second), and if we test the movie, in fact seconds_mc grows every second. The problem is that it doesn't stop growing, so let's add some more code:


function attachSecond():Void {
seconds++;
seconds_mc._width = seconds*3+6;
seconds_mc._height = seconds*3+6;
checkSeconds();
}

function removeSeconds():Void {
seconds_mc._width = 6;
seconds_mc._height = 6;
}

function checkSeconds():Void {
if(seconds>59){
seconds = 0;
removeSeconds();
}
}

timer = setInterval(attachSecond, 1000);


In our function "attachSecond" we are calling "checkSeconds" to see whether the cycle has been completed and we have already 60 seconds, if so, we call removeSeconds to resize seconds_mc to 6 pixels that we decided to have (in the previous tutorial) instead of a 0 (zero) to see something on the stage. Then we should attach another minute:


function attachSecond():Void {
seconds++;
seconds_mc._width = seconds*3+6;
seconds_mc._height = seconds*3+6;
checkSeconds();
}

function removeSeconds():Void {
seconds_mc._width = 6;
seconds_mc._height = 6;
}

function checkSeconds():Void {
if(seconds>59){
seconds = 0;
removeSeconds();
attachMinute();
}
}

function attachMinute():Void {
minutes++;
minutes_mc._width = minutes*3+6;
minutes_mc._height = minutes*3+6;
}

timer = setInterval(attachSecond, 1000);


How about if it was minute number 60? so we would need to check if it is, reset the value back to zero and attach one more hour...


function attachMinute():Void {
minutes++;
minutes_mc._width = minutes*3+6;
minutes_mc._height = minutes*3+6;
checkMinutes();
}

function checkMinutes():Void {
if(minutes>59){
minutes = 0;
removeMinutes();
attachHour();
}
}

function removeMinutes():Void {
minutes_mc._width = 6;
minutes_mc._height = 6;
}

function attachHour():Void {
hour++;
hours_mc._width = hour*15+6;
hours_mc._height = hour*15+6;
}

timer = setInterval(attachSecond, 1000);


and, how about if it's hour 13? or even worse, hour 25?
then, we need to check the hours and set it as it should be:


function attachHour():Void {
hour++;
checkHours();
hours_mc._width = hour*15+6;
hours_mc._height = hour*15+6;
}

function checkHours():Void {
if(hour>11){
hour = (realHours<12)?12:removeHours();
}
}

function removeHours():Number {
hours_mc._width = 6;
hours_mc._height = 6;
hour = 1; return hour;
}

timer = setInterval(attachSecond, 1000);


if we test our movie, it should work fine and the clock should be ok, adding minutes and/or hours when adequate.
The whole code looks as follows:


var timer:Number;
var timedate:Date = new Date();
var realHours = timedate.getHours();
var hour:Number = (realHours<=12) ? realHours : realHours-12;
var minutes:Number = timedate.getMinutes();
var seconds:Number = timedate.getSeconds();
delete timedate;

trace(hour+":"+minutes+":"+seconds);

seconds_mc._width = seconds*3+6;
seconds_mc._height = seconds*3+6;
minutes_mc._width = minutes*3+6;
minutes_mc._height = minutes*3+6;
hours_mc._width = hour*15+6;
hours_mc._height = hour*15+6;

function attachSecond():Void {
seconds++;
seconds_mc._width = seconds*3+6;
seconds_mc._height = seconds*3+6;
checkSeconds();
}

function removeSeconds():Void {
seconds_mc._width = 6;
seconds_mc._height = 6;
}

function checkSeconds():Void {
if(seconds>59){
seconds = 0;
removeSeconds();
attachMinute();
}
}

function attachMinute():Void {
minutes++;
minutes_mc._width = minutes*3+6;
minutes_mc._height = minutes*3+6;
checkMinutes();
}

function checkMinutes():Void {
if(minutes>59){
minutes = 0;
removeMinutes();
attachHour();
}
}

function removeMinutes():Void {
minutes_mc._width = 6;
minutes_mc._height = 6;
}

function attachHour():Void {
hour++;
checkHours();
hours_mc._width = hour*15+6;
hours_mc._height = hour*15+6;
}

function checkHours():Void {
if(hour>11){
hour = (realHours<12)?12:removeHours();
}
}

function removeHours():Number {
hours_mc._width = 6;
hours_mc._height = 6;
hour = 1;
return hour;
}

timer = setInterval(attachSecond, 1000);

As a good practice, we have declared the variable timer at the beginning so flash knows that the variable exists and which sort of variable is.
Then is up to you to add more stuff, for example tweenings, changing design, etc. and don't forget to add something to help "reading" the clock, for example the cross I drew in mine showing numbers from 1 to 12 and from 10 to 60 so the users will have an idea about the time...
and basically that's it! you have a clock working 100% and you can now upload it to any widget distributor like widgipedia, widgetbox or yourminis.
One of these days I will post a clock I'm working on using the same code but different design to give you an idea of what you can actually do.

Any question or comment is very welcomed ;)

salut!

Sunday, August 05, 2007

Building flash web widgets - Part II

This is the second part of the series "building flash web widgets", click here to see the first part.
Ok, I've done my homework and I know how my clock is going to look like, of course in the meantime I will continue explaining how to build something similar to the clock in Part I.
Now that we have the time showing in the output window, we need to translate that into objects on the stage.

- From the menu, go to insert>timeline>layer to add another layer and rename it "elements"


- Press select the oval tool pressing "o" and draw an circle on the stage, the size is not important but has to be symmetric, mine is 25x25 pixels, and is better if it has no stroke so it won't look strange if at different size. Select the circle and go to modify>convert to symbol (or press F8) to convert it to a movieclip and call it "circle_mc".


- Select the instance of circle_mc you have on the stage and write "hours_mc" as its instance name and change its alpha value to 90.

- Add two more instances of circle_mc to the stage, one will be called "minutes_mc" and the one on top will be "seconds_mc"; minutes_mc will have an alpha value of 60 and seconds_mc will have an alpha value of 30. We need to align all the elements to the centre of the stage.


- Now the code. Lets add the following lines to the actioncript we already have:

seconds_mc._width = seconds*3;
seconds_mc._height = seconds*3;
minutes_mc._width = minutes*3;
minutes_mc._height = minutes*3;
hours_mc._width = hour*15;
hours_mc._height = hour*15;


What we are telling flash is, the width and height of each instance it will change depending on the value of the related variables. Minutes and seconds are multiplied by 3 and hours are multiplied by 15.
why?
ok, let's see the maths:
- The idea is that the circles grow as much as 180 pixels so they will still be visible on the stage, as each minute has 60 seconds, then we divide 180 by 60 that give us 3 so the seconds will be different to one another by 3 pixels in size. Same for minutes.
Now, hours is different as there are only 12 hours per cycle, so we divide our 180 pixels by 12 and that is 15, so every 15 pixels there will be one hour.
But there is something I don't like; how about if the hours and minutes are 0 (zero)? visually will not be nice as the stage will be almost empty...
As we still have space to complete our 200 pixels, let's add 6 pixels to each value:

seconds_mc._width = seconds*3+6;
seconds_mc._height = seconds*3+6;
minutes_mc._width = minutes*3+6;
minutes_mc._height = minutes*3+6;
hours_mc._width = hour*15+6;
hours_mc._height = hour*15+6;


ok, now even if the value is zero we can still see the elements on the stage.
The whole code so far is:

var timedate:Date = new Date();
var realHours = timedate.getHours();
var hour:Number = (realHours<=12) ? realHours : realHours-12; var minutes:Number = timedate.getMinutes(); var seconds:Number = timedate.getSeconds(); delete timedate; trace(hour+":"+minutes+":"+seconds); seconds_mc._width = seconds*3+6; seconds_mc._height = seconds*3+6; minutes_mc._width = minutes*3+6; minutes_mc._height = minutes*3+6; hours_mc._width = hour*15+6; hours_mc._height = hour*15+6;


Testing the movie, you should be able to see how we are manipulating the size of the elements on the stage depending on the time. Cool!

In the following tutorial, we will see how to update the values and have a clock working 100%.

Salut!

Wednesday, August 01, 2007

Building flash web widgets - Part I

I have already written something about building small flash applications that later on I made them widgets:
- Flash add to del.icio.us & the widget in widgipedia. I used a similar script for the rest of the buttons I uploaded to widgipedia.

- Skype status in flash, used to build the widgets Flash Skype Status & Skype analogue clock uploaded to widgetbox.

- Flash-php file downloads counter, that easily can be made a widget.

So, the idea of this "series" of tutorials is to build a flash widget and upload it into a widget platform for the world to see, use, rate & you become famous as I did... :D (I'm joking, ok?)

I will not ask you to build the basic "hello world" as I would prefer to go much further than that, even though we will build a basic widget: a clock; but we will use the time units in a more creative way and we will build something like:


I assume you have Macromedia Flash 8 (or Adobe Flash CS3) installed and you are familiar with it.

Let's start:

- Create a new flash document and change its properties going to modify>document or pressing control+j (apple+j if in Mac), the new dimensions should be 200 width & 200 height, however, its better if your widget is even smaller; change its frame rate to 24fps and click ok.

- Our stage is empty and we have only one frame; rename that frame "actionscript" and lock it as we don't want anything else on that layer, just our actionscript (best practices, you see)


- Select the first frame (the only one we will use, best practices...) and add the following code:

var timedate:Date = new Date();
var realHours = timedate.getHours();
var minutes:Number = timedate.getMinutes();
var seconds:Number = timedate.getSeconds();

delete timedate;
trace(realHours+":"+minutes+":"+seconds);


Press control+enter to test your movie and you should see something like 22:44:38 in the output window and it is the actual time as taken from your computer's system.
What we are doing is:
- instantiating the date object in a variable called timedate.
- calling three different methods of the date object to get the hours, minutes and seconds and storing the values in three different variables: realHours, minutes & seconds.
- deleting the date object instance as its not needed any more so we clean it from the memory (best practices...)
- with trace we tell the output window to show us what the variables have stored.

ok, we now know how late it is, but, to be honest, I don't like that of "22 hours" as its sounds to military for me and I'm used to see 10pm instead of 22 hrs...
so, let's change the code:


var timedate:Date = new Date();
var realHours = timedate.getHours();
var hour:Number;
if (realHours<=12) {
hour = realHours;
} else {
hour = realHours-12;
}
var minutes:Number = timedate.getMinutes();
var seconds:Number = timedate.getSeconds();

delete timedate;
trace(hour+":"+minutes+":"+seconds);


Similar idea, we have just added a new variable: hour and its value depends on realHours value, using a conditional we are sure not to use the 22hrs format but a more understandable one (and better for this example). Testing our movie, we should have something like 10:45:14.

Actually, the code looks a bit too messy; having a conditional in the middle of the way doesn't look that good, but good job there is a short cut for that conditional, so, we change the code again:


var timedate:Date = new Date();
var realHours = timedate.getHours();
var hour:Number = (realHours<=12) ? realHours : realHours-12;
var minutes:Number = timedate.getMinutes();
var seconds:Number = timedate.getSeconds();

delete timedate;
trace(hour+":"+minutes+":"+seconds);


It's exactly the same, just a different syntax that I find cleaner. If you test your movie, your output window should show you something like 10:50:11.

Well, I'm afraid that's it for today; I've got to do some house work now but we will continue soon. In the meantime, think about your design, read more about the date object and see you later.

salut!

Sunday, July 29, 2007

ChangeColour Actionscript 2 class

I made this class some time ago and I'm still using it whenever I don't have time or creativity to do any other rollOver - rollOut effect; One of my readers (who saw the Spanish-Polish application) asked me about it so, why not sharing the code?

I guess these days I would do it in a different way but still does the job; to use it, just copy and paste the following code into your actionscript editor and save it as ChangeColour.as

/*
*
* Version 1
*
* Movieclip rollOver and rollOut ChangeColour class
*
* Author: Ernesto Quezada, Overloadstudios (ernesto.quezada(a)gmail.com)
* Date: October 2006
*
* Description: Gradually changes colour and brightness to a movieclip when rolled over
* and back to its original colour when rolled out
*
*/
class ChangeColour extends MovieClip {

private var control:Number = -10;
private var addShine:Object;
private var currentState:String;
private var myColour:Color;

// -- Constructor --
private function ChangeColour() {
currentState = "rolledOut";
}

// -- Events --
private function onRollOver():Void {
currentState = "rolledOver";
this.onEnterFrame = function () {
checkState();
};
}
private function onRollOut():Void {
currentState = "rolledOut";
}

// -- private functions --
private function checkState():Void {
myColour = new Color(this);
myColour.setTransform(addShine);
if (currentState == "rolledOver") {
if (control<=100) { control += 10; addShine = {rb:control, gb:control-20, bb:control-50}; } else { addShine = {rb:0, gb:0, bb:0}; } myColour.setTransform(addShine); updateAfterEvent(); } else if (currentState == "rolledOut") { if (control>=10) {
control -= 10;
addShine = {rb:control, gb:control, bb:control};
} else {
delete this.onEnterFrame;
}
myColour.setTransform(addShine);
updateAfterEvent();
}
}
}

Then put it in a folder called Classes (or wherever your classpath points to) and whenever you want to use it, in the Flash library, right click on a movieclip, select export for actionscript and write ChangeColour as the AS 2.0 class.

I know, I made it 9 months ago and needs a review...

salut!